How to hide/show tab based on the Business Process Flow stage
Process... How to hide/show tab based on the Business Process Flow stage
Back in the day (CRM Dynamics 2015), this was much more complicated to get the process stage, now this has been a bit more simple.

Select the Financials tab.

Go to the Properties pane and note the Name value "tab_Financials." This is the tab that you will show/hide based on the selected BPF stage.

Close the form editor browser tab.
Select Done.

Create a script
You can use Visual Studio Code to create the JavaScript.
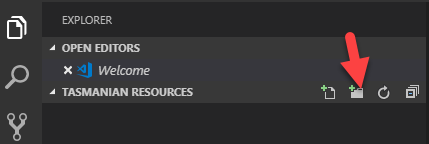
Start Visual Studio Code and select Explorer.

Select Open Folder.

Create new folder and name the folder Tasmanian Resources.

Select the folder and select the Select Folder button.

Select New Folder.
Name the new folder Scripts.

Right-click the Scripts folder and select New File.

Name the new file ShowHideFinancialTab.js.

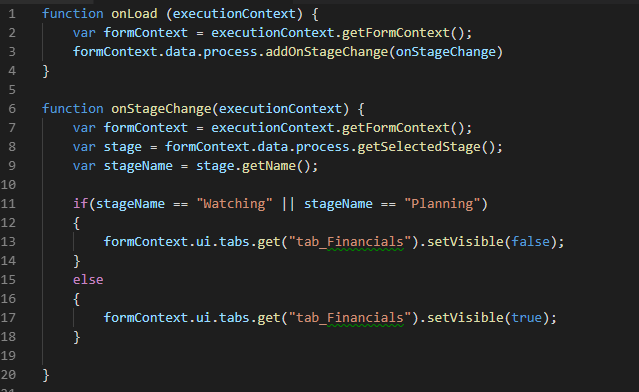
Add the following snippet to the file. This is the function that will be called when the form loads, and it will get the form context and register the function that you want to call when the Business Process Flow stage changes.

Add the onStageChange function to the file. This is the function that will be called when the BPF stage changes.

Add the following snippet inside the onStageChange function. This snippet will get the formContext, selected stage, and the stage name.

Check if the selected stage name is Watching or Planning. Add the following snippet after the previous one.

Hide the Financials tab if the condition evaluates to true. Add the following snippet inside if condition.
Show the Financials tab if the condition evaluates to false. Add the following snippet after the if condition.
Your script file should look like the following image.
Select File and Save All.
Create new folder and name the folder Tasmanian Resources.
Select the folder and select the Select Folder button.
Select New Folder.
Name the new folder Scripts.
Right-click the Scripts folder and select New File.
Name the new file ShowHideFinancialTab.js.
Add the following snippet to the file. This is the function that will be called when the form loads, and it will get the form context and register the function that you want to call when the Business Process Flow stage changes.
Add the onStageChange function to the file. This is the function that will be called when the BPF stage changes.
Add the following snippet inside the onStageChange function. This snippet will get the formContext, selected stage, and the stage name.
Check if the selected stage name is Watching or Planning. Add the following snippet after the previous one.
Hide the Financials tab if the condition evaluates to true. Add the following snippet inside if condition.
Show the Financials tab if the condition evaluates to false. Add the following snippet after the if condition.
Your script file should look like the following image.
Select File and Save All.
Add a resource to a solution
Now you will add the script that you created to the Class solution and make sure that your script runs when the form is loaded.
Each exercise consists of a scenario and learning objectives; the scenario describes the purpose of the exercises, while the objectives are listed and have bullet points.
Now you will add the script that you created to the Class solution and make sure that your script runs when the form is loaded.
Each exercise consists of a scenario and learning objectives; the scenario describes the purpose of the exercises, while the objectives are listed and have bullet points.
Add a web resource to a solution
Select Solutions and open the Class solution.
Select New > Other > Web Resource.

Enter ShowHideFinancialsTab for Name, Show/Hide Financials Tab for Display Name, select Script (Jscript) for Type, select English for Language, and then select Browse.

Select the ShowHideFinancialTab.js file that you created and select Open.

Select Save.
Select Publish and wait for the publishing to complete.
Close the web resource editor browser tab.
Select Done. Do not leave this page.

Register OnLoad
In this task, you will add the onLoad functions to the Onload event of the Player Recruiting form.
Select to open the Player Recruiting entity.

Select the Forms tab and open the Information form.

Select Switch to classic.

Select Form Properties.

Select Add.

Search for tt and select tt_ShowHideFinancialsTab.
Select Add.

Go to the Event Handlers section, select Form for Control, select OnLoad for Event, and then select Add.

Make sure that tt_ShowHideFinancialsTab is selected for Library, enter onLoad for Function, select the Pass execution context as first parameter check box, and then select OK.

You want the onStageChange function to be called when the form loads. Select Add again.

Make sure that tt_ShowHideFinancialsTab is selected for Library, enter onStageChange for Function, select the Pass execution context as first parameter check box, and then select OK.

Select OK again.

Select Save and Close.

Close the form editor browser tab.
Select Done.

Select Solutions.

Select Publish All Customizations and wait for the Publishing to complete. Do not leave this page.

Select Solutions and open the Class solution.
Select New > Other > Web Resource.
Enter ShowHideFinancialsTab for Name, Show/Hide Financials Tab for Display Name, select Script (Jscript) for Type, select English for Language, and then select Browse.
Select the ShowHideFinancialTab.js file that you created and select Open.
Select Save.
Select Publish and wait for the publishing to complete.
Close the web resource editor browser tab.
Select Done. Do not leave this page.
Register OnLoad
In this task, you will add the onLoad functions to the Onload event of the Player Recruiting form.
Select to open the Player Recruiting entity.
Select the Forms tab and open the Information form.
Select Switch to classic.
Select Form Properties.
Select Add.
Search for tt and select tt_ShowHideFinancialsTab.
Select Add.
Go to the Event Handlers section, select Form for Control, select OnLoad for Event, and then select Add.
Make sure that tt_ShowHideFinancialsTab is selected for Library, enter onLoad for Function, select the Pass execution context as first parameter check box, and then select OK.
You want the onStageChange function to be called when the form loads. Select Add again.
Make sure that tt_ShowHideFinancialsTab is selected for Library, enter onStageChange for Function, select the Pass execution context as first parameter check box, and then select OK.
Select OK again.
Select Save and Close.
Close the form editor browser tab.
Select Done.
Select Solutions.
Select Publish All Customizations and wait for the Publishing to complete. Do not leave this page.
Test your work
In this task, you will test your work.
Select Apps and select to open the Scout Zone application.

Select Player Recruitings and open one of the records.

The Watching stage of the BPF should be selected and the Financials tab should be hidden.

Select the Watching stage, select College for Player Level, and then select Next Stage.

The BPF should advance to the Planning stage and the Financials tab should stay hidden.

Select Pursue for Scouting Recommendation and then select Next Stage.

The BPF should advance to the Pursuing stage and the Financials tab should now become visible.

Select Yes for both Develop Budget and Budget Approved, and then select Next Stage.
The Financials tab should stay visible.
Select Previous Stage.

Select Previous Stage again.
The BPF should now be in the Planning stage and the Financials tab should become hidden again.
In this task, you will test your work.
Select Apps and select to open the Scout Zone application.
Select Player Recruitings and open one of the records.
The Watching stage of the BPF should be selected and the Financials tab should be hidden.
Select the Watching stage, select College for Player Level, and then select Next Stage.
The BPF should advance to the Planning stage and the Financials tab should stay hidden.
Select Pursue for Scouting Recommendation and then select Next Stage.
The BPF should advance to the Pursuing stage and the Financials tab should now become visible.
Select Yes for both Develop Budget and Budget Approved, and then select Next Stage.
The Financials tab should stay visible.
Select Previous Stage.
Select Previous Stage again.
The BPF should now be in the Planning stage and the Financials tab should become hidden again.

Comments
Post a Comment